ESP32 Linux 开发笔记
[官方教程](https://docs.espressif.com/projects/esp-idf/zh_CN/v5.4.1/esp32c3/get-started/linux-macos-setup.html#get-started-linux-macos-first-steps)
# 第一步:安装准备
```
sudo apt-get install git wget flex bison gperf python3 python3-pip python3-venv cmake ninja-build ccache libffi-dev libssl-dev dfu-util libusb-1.0-0
```
note: 我没有做这一步
# 第二步:获取 ESP-IDF
这里直接看最下面, 有个国内站点
推荐国内用户使用国内的下载服务器,以加快下载速度。
```
git clone git@github.com:espressif/esp-idf.git
git checkout v5.4.1
git reset --hard --recurse-submodule
cd ~/esp/esp-idf
export IDF_GITHUB_ASSETS="dl.espressif.cn/github_assets"
./install.sh
```
注意: 下载好后切换到一个好分支, 默认会到不稳定的开发分支
# 第三步:设置工具
除了 ESP-IDF 本身,还需要为支持 ESP32-C3 的项目安装 ESP-IDF 使用的各种工具,比如编译器、调试器、Python 包等。同样地, 有国内资源
我之前这步没有选择国内资源, 下载失败了我没注意, 然后后续步骤失败了
```
cd ~/esp/esp-idf
export IDF_GITHUB_ASSETS="dl.espressif.com/github_assets"
./install.sh esp32c3
```
然后安装一下环境, 这个在改路径之前只需要跑一次
```
export IDF_TOOLS_PATH="$HOME/required_idf_tools_path"
./install.sh
. ./export.sh
```
# 第四步:设置环境变量
每次开终端都要跑一次
```
. ./esp-idf/export.sh
```
# 第五步:开始使用 ESP-IDF 吧
github clone 下来之后, 路径叫esp-idf, 把你自己的工程放到esp-idf这个路径, 然后进入你自己的工程路径就可以进入接下来的操作了
把项目设置成对应的芯片库
```
idf.py set-target esp32c3
```
编译
```
idf.py build
```
把usb插进电脑, 烧录, 这一条同时也会build
```
idf.py flash -p /dev/ttyACM0
```
这个是看打印
```
idf.py monitor -p /dev/ttyACM0
```
# 第二次使用
用export时失败了, 提示我重新install
```
. ./export.sh
---
Checking "python3" ...
Python 3.10.12
"python3" has been detected
ERROR: ESP-IDF Python virtual environment "/home/jax/required_idf_tools_path/python_env/idf5.4_py3.10_env/bin/python" not found. Please run the install script to set it up before proceeding.
```
只能重新install一次
```
cd ~/esp/esp-idf
export IDF_GITHUB_ASSETS="dl.espressif.cn/github_assets"
./install.sh
```
后来发现不是这个的原因, 应该是cmake的原因, 即每次都要设置一下用哪个cmake, 有空把他设置成默认
```
export PATH=/home/jax/Documents/Software/cmake-3.30.3-linux-x86_64/bin:$PATH
```
# 第三次使用
还真是只能每次都重新install一次, 顺序如下
```
export PATH=/home/jax/Documents/Software/cmake-3.30.3-linux-x86_64/bin:$PATH
export IDF_GITHUB_ASSETS="dl.espressif.cn/github_assets"
export IDF_TOOLS_PATH="$HOME/required_idf_tools_path"
#./install.sh esp32c3
. ./export.sh
cd ../dp_esp
idf.py build
idf.py flash -p /dev/ttyACM0
export BLE_NAME=
BLE_BRAND=iKoffy-IP01 idf.py all
idf.py bootloader-flash # Brn BL only
```
# duke更新了printer分支
还真是只能每次都重新install一次, 顺序如下
```
export PATH=/home/jax/Documents/Software/cmake-3.30.3-linux-x86_64/bin:$PATH
export IDF_GITHUB_ASSETS="dl.espressif.cn/github_assets"
export IDF_TOOLS_PATH="$HOME/required_idf_tools_path"
#./install.sh esp32c3
. ./export.sh
cd ../dp_esp/src
idf.py build
idf.py flash -p /dev/ttyACM0
BLE_BRAND=iKoffy-IP01 idf.py all
idf.py bootloader-flash # Burn BL only
```
# 仅蓝牙升级到带wifi
如果机器之前用了仅蓝牙的版本(313899之前), 然后直接烧录带wifi的版本(b37fdd后), 机器不正常, 需要选择性执行下面两条命令
```
idf.py bootloader-flash -p /dev/ttyACM0
idf.py partition-table
```
但是我执行完 bootloader 还是不行, 执行完 partition-table 还是不行, 他执行的时候不用带设备名, 应该是处理一些本地文件而已, 并不直接操作设备, 但是我带了设备名之后, 执行完虽然报错, 但是确实机器成功启动了, 不知道是不是上一条命令延迟生效了, 以后待研究
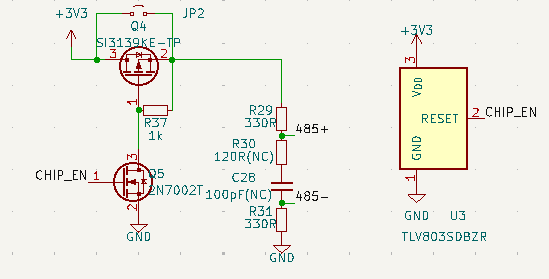
# 启动失败解决方案调试笔记
现象: 插着485的线, 蓝牙版开机失败
分析: usb转485的机器和蓝牙板子的485+上拉电阻共同分压, 导致有一个1.65v的电压进入了3.3v网络, 导致上电时电平不正常
解决方法: 加了一些硬件, 让没有上电的时候, 485+到3.3v的网络是阻断状态, 上电完毕正常导通
# esp32 单载波模式
因为以前的产品需要测产品的单载波模式的频偏, 最近的产品也不例外, 进入单载波有几种模式:
1. 用 Windows 的 esp32RfTestTool 的软件
2. 在正式固件插入相关功能的代码, 例如 esp_phy_wifi_tx_tone
3. 用示例代码 examples/phy/cert_test/ 改一改, 烧录到 RAM 临时运行
4. 用示例代码 examples/phy/cert_test/ 改一改, 烧录到 flash 运行, 测试完再烧录正式代码
测试结果:
1. 方案非常麻烦, 需要点击UI界面来走流程, 且跟烧录程序不同环境, 需要两次上治具, 无法流程化
2. 在自己的代码上改有点难度, 会有各种奇怪的问题, 调用库等, 还涉及到会不会影响主程序
3. 示例代码是OK的, 但是要移植到RAM失败了, 有各种问题
4. 目前采用这种方法
在 examples/phy/cert_test/main/cert_test.c 中添加以下代码即可实现
```
gpio_config_t io_conf = {};
io_conf.intr_type = GPIO_INTR_DISABLE; // 禁用中断
io_conf.mode = GPIO_MODE_OUTPUT; // 输出模式
io_conf.pin_bit_mask = (1ULL << 8); // GPIO8
io_conf.pull_down_en = 0;
io_conf.pull_up_en = 0;
gpio_config(&io_conf);
gpio_set_level(GPIO_NUM_8, 1); // 拉高 GPIO8,LED 亮(如果是共阴接法)
io_conf.intr_type = GPIO_INTR_DISABLE; // 禁用中断
io_conf.mode = GPIO_MODE_OUTPUT; // 输出模式
io_conf.pin_bit_mask = (1ULL << 8); // GPIO8
io_conf.pull_down_en = 0;
io_conf.pull_up_en = 0;
gpio_config(&io_conf);
gpio_set_level(GPIO_NUM_9, 0);
// bailey
esp_phy_wifi_tx_tone(1, 7, 0);
while (true) {
vTaskDelay(pdMS_TO_TICKS(1000));
}
```
# 烧录流程
烧录可以不用idf.py, 用 python -m esptool 即可
单载波代码需要
1. 分区表
2. bootloader
3. fw
4. phy_init_data.bin
正式代码需要
1. 分区表
2. bootloader
3. fw
4. 预存图片.bin
```
# 配置环境
export PATH=/home/jax/Documents/Software/cmake-3.30.3-linux-x86_64/bin:$PATH
export IDF_GITHUB_ASSETS="dl.espressif.cn/github_assets"
export IDF_TOOLS_PATH="$HOME/required_idf_tools_path"
./install.sh esp32c3
. ./export.sh
cd ../dp_esp
# 单载波代码
python -m esptool --chip esp32c3 -p /dev/ttyACM0 -b 460800 --before default_reset --after hard_reset write_flash --flash_mode dio --flash_size 2MB --flash_freq 80m 0x0 test/bootloader.bin 0x8000 test/partition-table.bin 0xf000 test/phy_init_data.bin 0x10000 test/cert_test.bin
# 测试完后擦除flash所有代码
python -m esptool --chip esp32c3 -p /dev/ttyACM0 erase_flash
# 烧录正式代码
python -m esptool --chip esp32c3 -p /dev/ttyACM0 -b 460800 --before default_reset --after hard_reset write_flash --flash_mode dio --flash_size 4MB --flash_freq 80m 0x0 bootloader.bin 0x8000 partition-table.bin 0x10000 dp_esp.bin 0x00187000 ikoffy.bin
```
评论
发表评论