博文

更换域名邮箱服务商

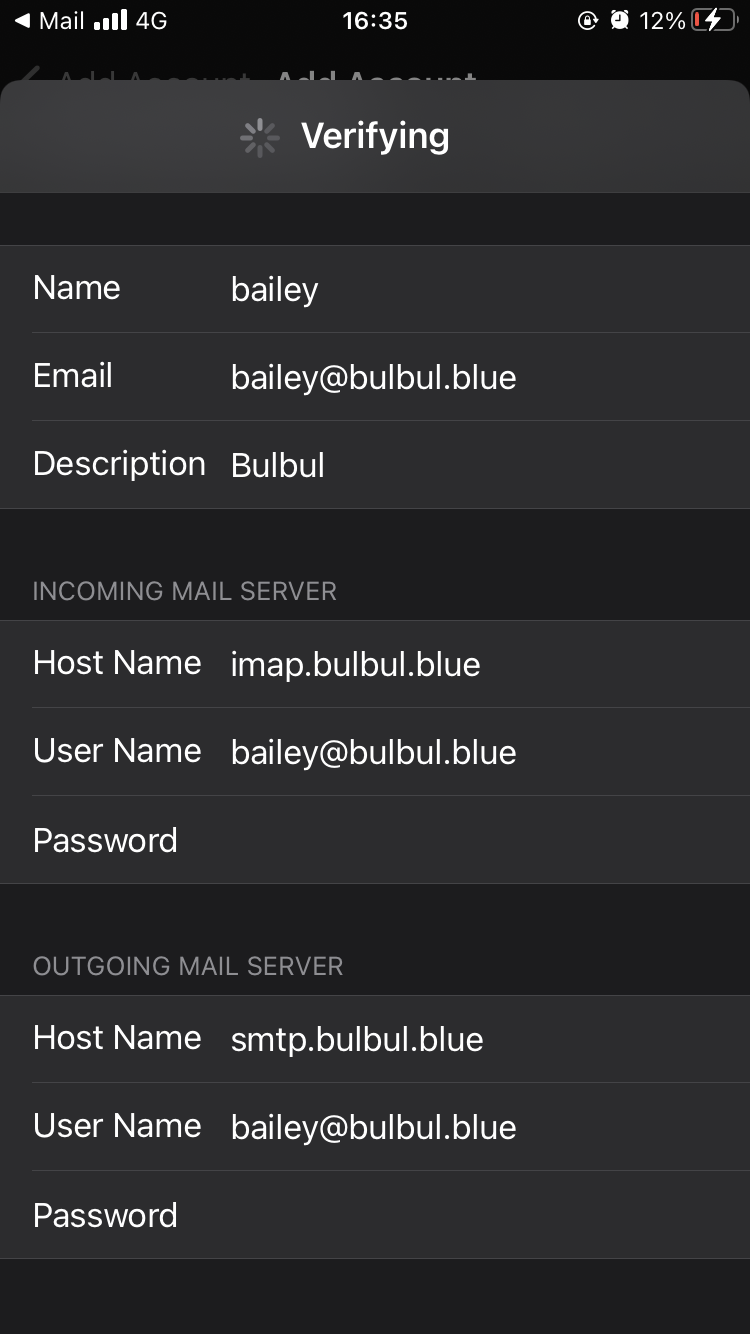
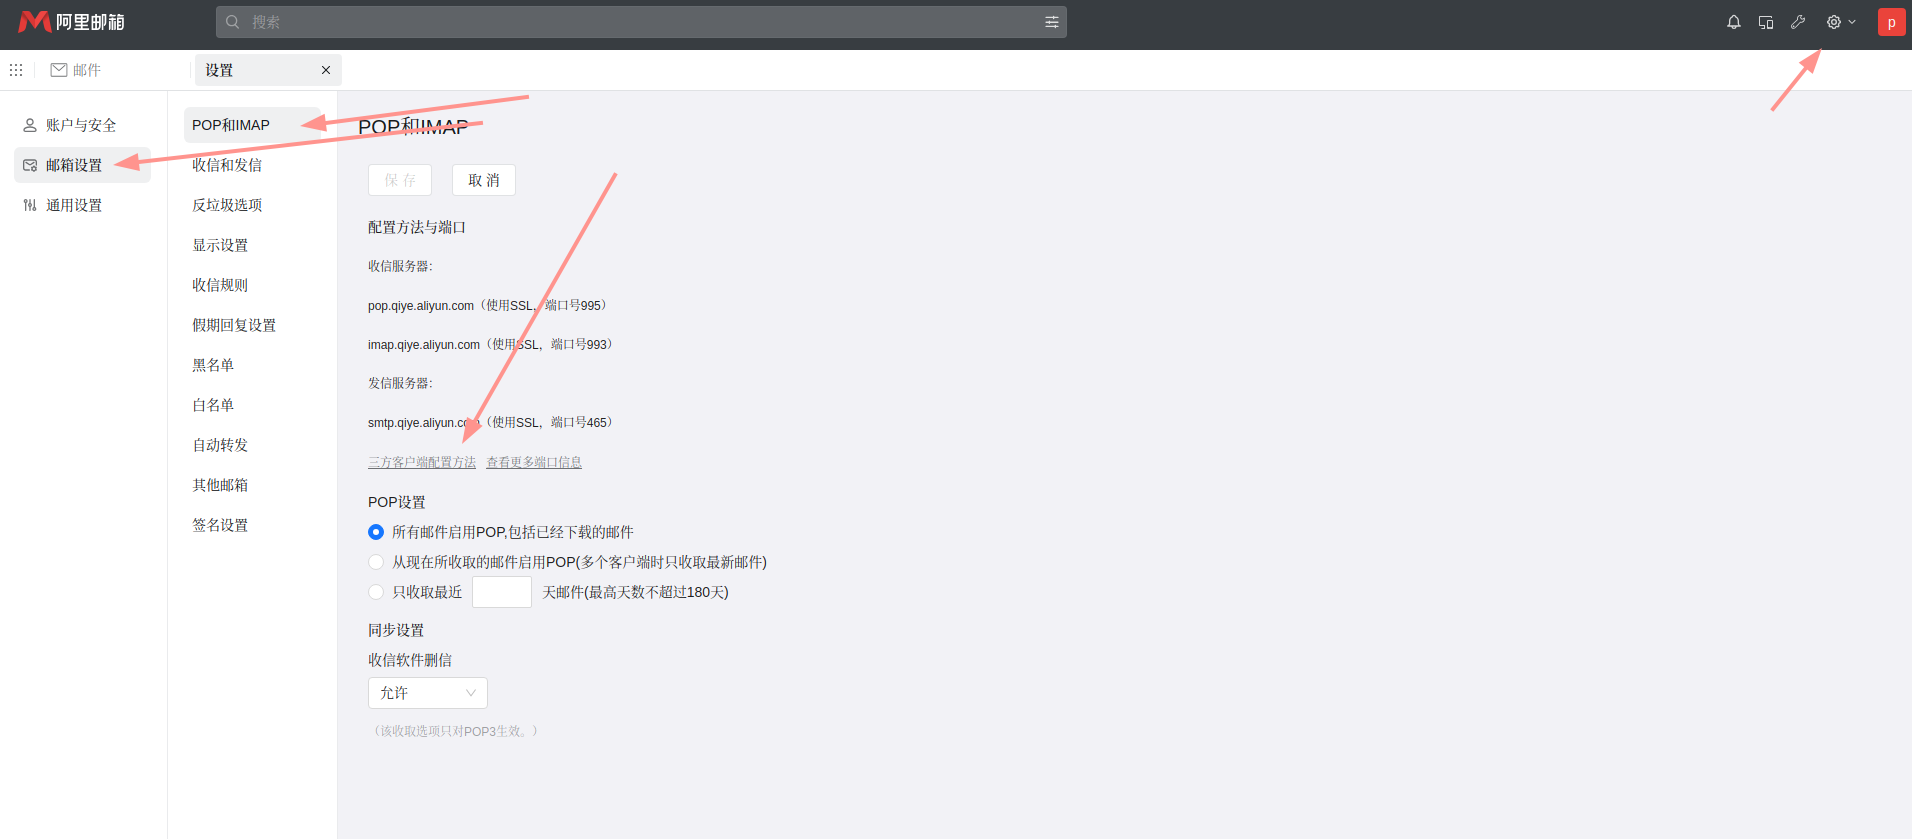
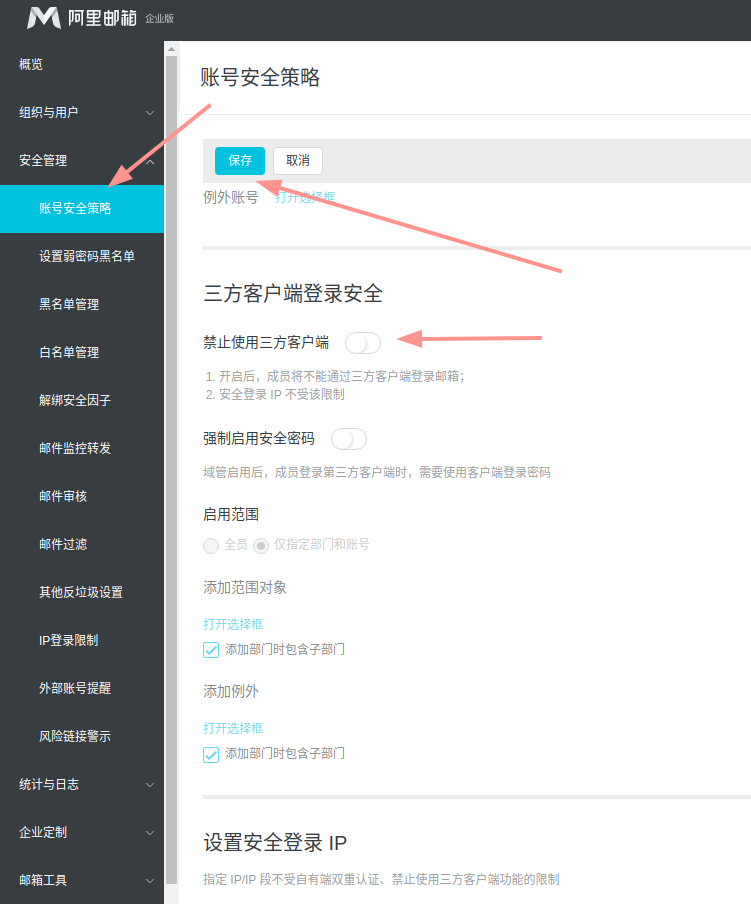
markdown 2021年用腾讯的域名邮箱到现在, 基本上没怎么用, 因为登录很麻烦, 每次都要扫码, 手机验证之类的, 一直想换一个, 在网上搜了一下 [几大免费企业邮箱服务商对比](https://www.iplaysoft.com/free-domain-email.html) 按照这个教程换了阿里云的, 虽然还是要实名制, 但是无所谓了吧 然后在iPhone的官方邮箱软件上登录该邮箱, 按照图片所示的教程设置, 但是不生效 [如何在iPhone手机上登录阿里邮箱](https://help.aliyun.com/document_detail/36672.html?spm=a2c4g.36595.0.i0) ![](https://raw.githubusercontent.com/Baileyus/blog_img/main/2023-12-20_16-37_1.png) 原来阿里云默认第三方软件登录是关闭的, 登录postmaster的账户, 打开, 保存就好了, 千万记得保存 [禁止使用三方客户端](https://help.aliyun.com/document_detail/606337.html?spm=a2c4g.36576.0.i0) ![](https://raw.githubusercontent.com/Baileyus/blog_img/main/2023-12-20_16-37.png) 手机上的设置 ![](https://raw.githubusercontent.com/Baileyus/blog_img/main/IMG_2898.PNG)
blogger使用技巧

markdown # 删除blogger底部的主题信息 不喜欢这个主题信息, 想删除 ![](https://raw.githubusercontent.com/Baileyus/blog_img/main/2023-12-16_09-46.png) 首先获取他的ID, 在浏览器F12查看, 并找到 ![](https://raw.githubusercontent.com/Baileyus/blog_img/main/2023-12-16_09-49.png) 进入主题背景, 编辑HTML, 找到这段话, 注释掉 但是不能保存, 估计为了推广, 做了保护机制 ![](https://raw.githubusercontent.com/Baileyus/blog_img/main/2023-12-16_09-58.png) 所以得用JavaScript动态删除, 进入控制台, 输入以下代码: ``` var d_div = document.getElementById("Attribution1") d_div.remove(); ``` ![](https://raw.githubusercontent.com/Baileyus/blog_img/main/2023-12-16_09-49_1.png) 删除成功 ![](https://raw.githubusercontent.com/Baileyus/blog_img/main/2023-12-16_09-53.png) 然后进入布局页面, 在添加JavaScript的地方, 加入你想加入的代码就可以了 ![](https://raw.githubusercontent.com/Baileyus/blog_img/main/2023-12-16_09-55.png) --- # JS调用报错 调试主页Markdown的时候发现经常有报错 ``` The resource from “https://raw.githubusercontent.com/xxx/blog_img/main/2404877392-indie_compiled.js” was blocked due to MIME type (“text/plain”) mism...

Markdown 表格调试

markdown # 开启表格选项 之前想在blog里用markdown的表格, 没生效, 后来才知道markdown的表格并不是一个标准的规范, 但是确实很多人有需求, 所以一般不会默认开启. showdown也是, 默认不会开启表格, 需要手动开启 [ showdown官方wiki之开启选项 ](https://github.com/showdownjs/showdown/wiki/Showdown-options) 在自己的blog后台编辑script那里加代码就可以开启了 方法1: ``` var converter = new showdown.Converter(); converter.setOption('tables', true); ``` 方法2: ``` var converter = new showdown.Converter({tables:true}); ``` # 美化表格 开启之后只有排版, 看不到效果, 以为是开启失败了, 研究了半天才知道是太丑了没认出来, 需要美化一下 [美化表格](https://megahertz66.github.io/technical-records/2020/08/28/%E9%9D%99%E6%80%81%E5%8D%9A%E5%AE%A2%E6%90%AD%E5%BB%BA%E8%AE%B0%E5%BD%95/) [表格美化css](https://megahertz66.github.io/technical-records/2020/08/28/%E9%9D%99%E6%80%81%E5%8D%9A%E5%AE%A2%E6%90%AD%E5%BB%BA%E8%AE%B0%E5%BD%95/) 从上面下载美化表格的css, 然后放到自己的图床PicGo里, 在库里找到这个文件, 点击raw, 会得到链接一个链接 https://raw.githubusercontent.com/Baileyus/blog_img/main/style.css 然后把 https://raw.githubusercontent.com/ 替换成-> http://raw.githack.com/ 就可以用了, 但是这个...

搭建88元一年的Linux僵毁服务器

markdown ![](https://raw.githubusercontent.com/Baileyus/blog_img/main/f3115cd0e88937cbf82507d9516ceeffe1f67633.png) # 序言 之前在淘宝买过服务器,配置方式少,配置参数不自由,经常坏档,特别难受,导致自己脱坑了很长一段时间,最近自己搭建了服务器之后,觉得很不错,所以写出这篇实操性很强的专栏帮助自己记忆,希望也能帮助到大家 特别鸣谢  [岁岁兽-SuiSuiShou](https://space.bilibili.com/48936688) 的专栏让我一晚上的时间就搭建了服务器(下面有链接) # 购买腾讯服务器 [https://cloud.tencent.com/](https://cloud.tencent.com/) 在此处购买腾讯云轻量服务器,新人套餐很便宜 ![](https://raw.githubusercontent.com/Baileyus/blog_img/main/a55c129988823038f02a2e3017537d94eb894891.png) ![](https://raw.githubusercontent.com/Baileyus/blog_img/main/d78e7fc4a075bfcc9e1c31994874596aa18988c4.png) 图片不代表实际情况,我购买的时候确实是80元/年 # 配置 Linux 系统 ## 进入腾讯服务器 [https://console.cloud.tencent.com/lighthouse/](https://console.cloud.tencent.com/lighthouse/) 首先从腾讯服务器的界面进入你的服务器 ![](https://raw.githubusercontent.com/Baileyus/blog_img/main/4659ffdefa31be62b58777abdd674f87d3ec53ac.png) 然后选择登陆的用户,默认就可以 ![](https://raw.githubusercontent.com/Baileyus/blog_img/main/b5e375092b0d...

U disk partition

markdown # Partitioned hard disk repartition ## Preface I have a U disk with two partitions, 20G and 98G. Now I need to divide into four areas, 20G, 75G, 16G, 8G. ## Repartition Back up files first, and then use the following command: ``` gdisk /dev/sda ``` Then I did the following: ``` GPT fdisk (gdisk) version 1.0.5 Partition table scan: MBR: protective BSD: not present APM: not present GPT: present Found valid GPT with protective MBR; using GPT. Command (? for help): d #Delete Partition number (1-4): 2 #The number of the partition to be deleted Command (? for help): n #New a partition Partition number (2-128, default 2): 2 #The number of the partition to be created First sector (34-249737182, default = 41945088) or {+-}size{KMGTP}: #Default Last sector (41945088-199231487, default = 199231487) or {+-}size{KMGTP}: +75G #Size Current type is 8300 (Linux filesystem) Hex code or GUID (L to show codes, Enter = 8300): #Default Changed type of partition to 'Linux...

Linux 编译, 加载, 卸载驱动demo

markdown 从github下载驱动 ``` git clone git@github.com:bsdb0y/linux-kernel-hello-world-driver.git ``` 直接编译 ``` make ``` 然后加载驱动, 驱动以ko结尾 ``` sudo insmod hello.ko [ 7188.189653] HELLO LOADED ``` 然后卸载驱动 ``` sudo rmmod hello [ 7201.989317] HELLO UNLOADED ```

重新生成SSL证书之后的问题

markdown ## 问题 最近SSL证书到期了, 正常情况下可以用以下命令续租: ``` sudo /etc/init.d/apache2 stop certbot renew sudo /etc/init.d/apache2 start ``` 但是我的Blog从服务器中摘除了, 所以要生成新的证书: ``` sudo /etc/init.d/apache2 stop sudo certbot certonly --standalone -d xxx.xxx.xxx... sudo /etc/init.d/apache2 start ``` 成功, 但是SSL还是显示失效 ## 解决方法 用一个没有DNS代理的二级域名, 上去看看, 发现SSL证书没有用最新的 ![](https://raw.githubusercontent.com/Baileyus/blog_img/main/2023-10-23_19-07_1.png) ![](https://raw.githubusercontent.com/Baileyus/blog_img/main/2023-10-23_19-09.png) 登录服务器, 查看证书目录, 果然多了一个 ``` ll /etc/letsencrypt/live/ drwx------ 5 root root 4096 Oct 23 10:41 ./ drwxr-xr-x 9 root root 4096 Oct 23 01:51 ../ -rw-r--r-- 1 root root 740 Feb 24 2022 README drwxr-xr-x 2 root root 4096 Oct 23 10:51 xxx.xxx-0001/ drwxr-xr-x 2 root root 4096 Jul 24 03:17 xxx.xxx/ ll /etc/letsencrypt/archive/ drwx------ 4 root root 4096 Oct 23 10:40 ./ drwxr-xr-x 9 root root 4096 Oct 23 01:51 ../ drwxr-xr-x 2 root root 4096 Oct 23 01:51 xxx.xxx-0001/...

把 Namesilo 域名转到 CloudFlare

markdown 之前在 Namesilo 里用了好几年, 但是前阵子变得很贵, 而且之前过期没提醒, 导致过期, 收了我500人民币, 很难受, 所以想把他转到 CloudFlare 里, 刚续费的时候因为有账单没结清, 所以要等一阵子 在 Namesilo 里先把域名解锁, 获取授权码 ![](https://raw.githubusercontent.com/Baileyus/blog_img/main/namesilo-to-godaddy-1.jpg) 在 CloudFlare 里申请转入 ![](https://raw.githubusercontent.com/Baileyus/blog_img/main/2023-10-19_19-27.png) 然后就可以了, 可能会收到 Namesilo 的确认, 不管他就可以

推算墨盒喷墨地址表格

markdown # 推算 测试原图: ![](https://raw.githubusercontent.com/Baileyus/blog_img/main/308_carrtridge_test.png) 原地址表格打印在纸上的测试图: ![](https://raw.githubusercontent.com/Baileyus/blog_img/main/20231010120927.jpg) 由图可见, 顺序已经乱了, 规律如下: 首先我们把地址表格 P列 列出来 | Line | P | | --- | --- | | 1 | 1 | | 2 | 2 | | 3 | 3 | | 4 | 4 | | 5 | 5 | | 6 | 6 | | 7 | 7 | | 8 | 8 | | 9 | 9 | | 10 | 10 | | 11 | 11 | | 12 | 12 | | 13 | 13 | | 14 | 14 | 第一行显示了 数字6, 表示第1行的内容是由 P6 决定的 同理, 第二行显示了 数字4, 表示第2行的内容是由 P4 决定的 ... 所以, 我们把 P6, P4, ... 按顺序重新排列, 如下: | Line | P | | --- | --- | | 1 | 6 | | 2 | 4 | | 3 | 2 | | 4 | 14 | | 5 | 12 | | 6 | 10 | | 7 | 8 | | 8 | 9 | | 9 | 11 | | 10 | 13 | | 11 | 1 | | 12 | 3 | | 13 | 5 | | 14 | 7 | 正好是图案的顺序, 排列之后重新做表, 打印的图案如下: ![](https://raw.githubusercontent.com/Baileyus/blog_img/main/20231010121000.jpg) --- ## 结论 用原表格生成的数据打印一次, 再按照打印后的乱序图片按顺序改P, 然后就可以生成新的表格 --- ## 错误推算 之前通过原手册的地址表格打印的图片按序号排好, 如下: | Line | P | | --- | --- | | 1 | 6 | | 2 | 4 | | 3 | 2 | | 4 | 14 | | 5 | 12...

初次使用 Blogger, 感觉非常好用

markdown 博客已经搭好了, 有 HTTPS, markdown, custom domain 等功能, 非常简单易用. 为了在 blog 中插入一些图片, 搭了一个基于 github 的图床服务器, 用于放一些图片. 放在 google 服务器上的话, 国内基本上是看不了了. 后续还要把一些调用国外服务的功能屏蔽掉, 大概就能在国内流畅使用了, 很舒服. --- [基于 Github 和 PicGo 的图床教程](https://zhuanlan.zhihu.com/p/347342082) [谷歌blogger平台建立国内可访问博客攻略](https://www.lawpai.com/2016/10/blogger.html) [优化blogger在国内访问几个要点](https://www.shibanfang.com/2022/11/blogger_16.html) [在国内流畅使用 Blogger 的方法(已无法访问)](https://blog.cyfan.top/p/620f3e8d.html) 图床测试图: ![demo 图片](https://raw.githubusercontent.com/Baileyus/blog_img/main/demo.jpg)

入驻 Blogger 的第一篇 Blog

markdown 一直想通过一些方法来记录生活和记笔记,之前自己在服务器上搭的Blog,需要在本地写博文,推送到github,然后登录服务器,同步;而且很多功能也没用上,对于我来说还是太麻烦了,所以还是找了一个现有的平台来写,Google旗下的,应该比较稳定。 这个网页默认是不支持markdown的,需要手动修改一下,[这个是教程](http://etrex.blogspot.com/2017/03/blogger-code-markdown-prettyprint.html)。 最主要的还是稳定、支持SSL、自定义域名,如果都可以的话,后续会把之前的博文搬过来。